Everything below is the same information the old manual had — just reorganized, searchable, and easier to scan. Use the box at the top to jump straight to a topic.
I. Introduction
Welcome to the land of LostHope. Here you can create imaginary characters and interact with other players in the game. Fighting creatures or even other players will reward you with experience, which you can use to further develop your character. Items are available to collect and increase your character's abilities in other ways. The game has been designed to be very deep in advancement of skills, variety of items, and overall uniqueness of each individual character.
II. Getting Started
a. Main Screen
The game is best viewed and played at 1024×768 screen resolution or higher. Recommended browsers for playing are Internet Explorer (version 6.x or 7.x) and FireFox (versions 1, 2, 3). The game has also been tested successfully on Opera (Windows), Safari, and Camino (Mac). When the screen first loads, the login form will be in the top middle of the screen, allowing you to type in your character name and password and start playing the game.
The middle menu contains various options to see more about the game:
- News — the default loader, with notable events posted by admins or wizards.
- Staff — a list of the people who help keep LostHope running, along with their contribution to the effort.
- Version info — where fixes and updates are posted, most recent first.
- Rules — a list of acceptable behavior within the game. These rules must be followed or punishment will occur.
- Forum — opens a new window to the LostHope forums, where discussions take place (open for anyone to read).
- Top 100 — opens a new window with a list of the top 100 players, their races, classes, and levels.
- Who's On — a list of everyone currently playing the game (except higher-ranked officials), shown right below the link.
b. Creating a Character
Creating your character has the greatest impact on how well your character will function. The creation form (opened by clicking either link below the login buttons) asks for basic information first. The name will be both the name of your character and your login name. Your password is what keeps others from accessing your account — don't forget it, and don't make it something easy to guess. Your email address is currently used for verification purposes, such as password changes and account cancellation.
i. Races
The starting races of LostHope include Imp, Elf, Hill Dwarf, Orc, Gnome, Ghoul, Goblin, Gargoyle, Fairy, and Siren. Choosing one affects your stats and starting location — each race has its own statistical bonus. Orcs, for example, gain an extra +30 to Strength and +10 to Vitality, which also lets them raise those skills higher than a character without the bonus. Most stats can be guessed from their name, but for detail see the Stats section below.
Table of stat increases per level for races ↗ii. Classes
The class you choose gives your character its starting skills. Every skill in the game can also be learned later by doing quests, so it's possible to turn a warrior into a mage — but the starting skills carry bonuses that are lost for good if dropped. So if a warrior and a mage start with the same stats and reach the same level, and the warrior decides to become a mage, the original mage would still be stronger, since it started with those skills and kept the bonuses.
The Brute is a massive warrior that uses fists as weapons. The Sharpshooter is a ranged fighter using bows and crossbows. The Warlock is a mystical fighter relying on magic. Assassins are quick, nimble fighters that prefer smaller weapons and hiding in darkness. Knights are similar to Brutes but use large weapons. Finally, the Dark Mage, similar to the Warlock, uses magic as a weapon but doesn't follow the rules set by the nobles.
Table of stat increases per level for classes ↗iii. Stats
Stats are the more vital aspect of character creation. They develop in-game based on your race and class, and your actions are based on them — skills just amplify what stats create.
- Strength is the primary attribute for how hard warriors hit in combat.
- Agility determines how easily your character evades others and affects how likely you are to hit an opponent.
- Vitality gives a bonus to defense, and is also important for magic users, affecting spell damage and cast chance.
- Psi is the primary attribute for mages; it greatly impacts spell damage.
- Speed is important for every class. It affects how many strikes you get against your opponent each round, as well as warriors' chance to hit and every character's evasion.
c. The Graphics Package
The game contains a fair number of images. Especially during login, it might take a while until all of them are fetched from the server. For Internet Explorer users, the preferred method is to download an image pack (.rar) or a pack as an executable — don't download this if you use the Firefox browser.
Once downloaded, double-click the file to open the extraction window. It will show "Install to…" followed by a text box — to ensure proper installation, make sure that box contains C:\ and nothing else. Once installed, the confirmation code will be located at C:\stratimgs\confirm.txt. Any images not found in the local folder will still be fetched from the server.
d. Logging In
Logging in is a simple process. On the LostHope main screen, there are two black boxes in the upper right. Enter your character name and password, then click Login or press Enter. You'll then enter the game — be patient, on slower connections it may take a minute to load everything, especially the first time.
III. Interface
a. Abilities Tab
Under Abilities, you can check your current character status. Health is shown as the red bar, with the mana bar underneath; hovering over either bar shows the numerical health and mana values. Attack and defense amounts sit just to the right of those bars. All of your character's resistances are shown in the colored bars below — gained either through item effects or by fighting magic users and elemental melee attackers. To the right are submenus within the Abilities tab.
Equipment shows the items your character is currently wearing or using, plus everything else in your inventory via the drop-down menu. The four buttons below let you alter or view these items. Each character can carry 20 items at a time, not counting equipped items — so up to 30 items total at once.
Magic shows the percentage of extra damage your spells do, based primarily on Psi and also Vitality. All known spells appear in the dropdown, with the same two buttons as Equipment. A character may learn up to 30 spells — it's worth keeping a variety, since different monsters and players resist different elements. Each time a spell is used in battle, your character gets better at casting it, and once the percent-to-next-level reaches 100, the spell levels up.
Skills is where you manage your character's skills. Each skill shows its current level and the experience needed to raise it again. With enough unused experience, two arrow icons appear next to the skill: the first raises it once, the second lets you commit 1, 10, or 50 points at a time (choose the amount by clicking the number above the arrows). Unused experience is shown just above the skill table. To drop a skill, double-click the cancel button on the far right — this refunds all experience spent on it.
Status shows badges earned by other players when identifying you (for reaching notable levels or accomplishments), trade licences (which let characters trade with each other), portal passes (free passage through portals after defeating their guards), and your current clan membership, if any.
Other is a set of helpful numbers: total experience earned; experience at the next level; experience still needed; experience bonus in % and absolute terms (both from item bonuses); cash on hand (usable at stores, but lost if defeated in battle); money stored at the bank (where various centers draw their fees from); and money bonus in % and absolute terms.
b. Land Tab
The Land Tab is probably the most complex part of LostHope. On the left is the view of your character within the world, with your coordinates shown at the top of that view. On the far right you can fight monsters, identify people, or duel other players. You move by clicking the arrows. Once you've established a camp, a [CA] button appears just left of the arrows — double-click it to quick-travel there. If your clan has a Fort, a [FO] button appears above it, working the same way.
By moving onto a unique location, you can use the Interact Tab to interact with whatever you've encountered:
 Wall — unable to walk through
 Barrier — requires a certain item to pass (or, for a checkpoint, a certain stat or badge)
 Quest item on the ground
 Quest monster
 Beast monster (random quests)
 NPC — talk to them for quests, etc.
 Portal — go through to be transported; some are invisible!
 Spawn Gate — attune here to respawn here when you die
 Rock — unable to walk through
 Your character — some players use their own avatar image
 Bank — deposit gold for safekeeping
 Clan Center — manage everything clan-related here
 Jail — sent here if caught fighting another player
 Armory — buy/sell armor
 Miscellaneous Shop — buy/sell potions and other items
 Weaponry — buy/sell weapons
 Trade Center — buy trade licences and manage trades
 Shrine — several different types exist
 Camp — a facility belonging to a player
 Fort — belongs to a clan
c. Interact Tab
Depending on where your character is standing, the location may have something worth interacting with (shown by an icon on the land). If there's nothing there, there won't be much to do. A shop or bank, on the other hand, can be accessed here.
Each shop in the world is unique, with its own buy/sell rates and a mix of permanent stock plus items players have sold to it. Items are grouped by class (headgear, leg armor, etc.), and you can buy whatever you can afford. Shops refresh their inventory roughly every 10 minutes, so what's available doesn't stay the same forever.
Banks are simple: deposit money to keep it safe in case of defeat in battle. Bank money can't be used for shops or trades directly, and can only be accessed at bank locations.
When fighting another player, guards have a chance of catching you and sending you to jail, where you can't move or do anything for a set time.
Trade centers sell trade licences for a set amount of money. With a licence, you can put items up for trade and trade for items others have listed — the better the licence, the bigger the profit.
Spawn gates let you set a new respawn location after being defeated in battle, at no cost, as many times as you like.
Barriers prevent players from passing unless they have a certain item in inventory.
Portals transport characters across large distances for a fee. Defeat the portal's guard to get free passage from then on — beating a guard grants free passage through all portals of that level and below.
Quest items can be picked up off the ground for quest completion. Some have spawn timers, so if nothing's there, check back later.
Quest monsters drop unique items for quests. Losing lets you try again, but winning starts a timer before you can fight that monster again.
NPCs usually give quests — they'll describe the item they want; hand it over and they'll reward you.
d. Help Tab
The Help Tab brought you here… remember?
e. Log Out Tab
Immediately removes your character from the land (except during battles). Just closing the window instead starts a timer that waits a while before considering your character gone — using this tab does it right away.
f. Top 100 Tab
Opens a new window, exactly the same as the one on the Main Screen.
g. Donate Tab
This game costs money to run. If you enjoy it and have some to spare, it's much appreciated toward keeping the server and game running. This opens a new window asking how much you'd like to give, then directs you to the PayPal payment options.
h. Options Tab
Gives you various options for the game. First, you can change your password if the current one feels insecure (this requires your email address). Second are the chat filters, letting you filter various chat messages. Third are graphics options — colors use RGB hex notation. For example, #331111 means dark red and #DDDDFF means bright blue. Various tools online make picking these values out visually more comfortable — have fun playing around!
IV. Chat
a. Chat Usage
To chat, you must be above level 10 (doesn't take long to reach). Once you have, click the black box after your name, type your message, and press Enter or click "Say" to send it. You may not see it immediately — chat refreshes once every 5 seconds.
b. Chat Syntax
For a normal message, just type what you want to say and press Enter. For an emote, start with a colon, e.g. : likes to eat food. To private-message someone, either click their name in chat, or type /w name, message. Ignore a player with /i name,; un-ignore with /h name,; list everyone you're ignoring with /li — note you cannot ignore moderators. To send a sales message, start with /s.
c. Chat Types
There are three chat rooms: the default regular chat, SalesChat (where all messages are sent as emotes), and ClanChat (visible only to your clan). When switching chat types, wait 5 seconds before assuming something's wrong — chat refreshes every 5 seconds.
d. Calculator
Use /calc to access the calculator built into chat. You can use the symbols [0-9]+*-/.()^ and spaces to form ordinary arithmetic expressions. Multiplication and division (*, /) take priority over addition and subtraction (+, -). The ^ symbol is the power function, written in binary prefix notation — so ^(2,3) means 2 to the power of 3, giving 8.
e. Memo
To memorize text, write /memo in front of it. To display the memorized text later, just type /memo.
There are also: /sta (beast), /shr (shrine), /skc (kills), /gem (stones given to Joe), and /cjc (JC status).
V. More Specific Information
a. More on Stats
Stats were given an overview earlier — here's a more detailed description.
Health — a measure of how much damage your character can take before it dies. Maximum health increases with each level and can be restored with health potions.
Mana — used to cast spells. Maximum mana increases with each level and can be restored with mana potions.
Strength — the stat melee damage mostly depends on.
Agility — the primary stat for whether you hit an enemy with a physical attack. Vital for fighters, and the primary damage-modifying stat for bow users.
Vitality — the primary stat for resisting spells, and for mages, for successfully landing a cast on a monster, with a small effect on spell damage too.
Psi — the primary stat for mages, the major factor in spell power.
Speed — determines the number of turns a player gets in battle and who attacks first each round. Also directly affects the chance to evade melee attacks.
b. More on Skills
There are more than 40 skills a player may obtain, though only 6 may be used at a time. All skills fire automatically and require no action from the player once gained.
List of all Skills ↗VI. Clans and Kingdoms
Clans
A clan is a union of players who share a chat channel, clan bonuses, and possibly a kingdom and a fort. Players high in a clan's hierarchy should help the lower ones for the clan to succeed. A clan's power is calculated from its members' levels — higher power means more options for bonuses and for settling a kingdom. The leader can appoint a co-leader to assist, plus councilors of several levels who can perform certain actions, like raising bonuses.
More specific rules:
- New clans can be started by anyone with 100,000 gold.
- Clans can have up to 5 members at a time.
- Once you leave your clan, you must wait 1 hour before joining or creating another.
- If a clan leader leaves, the co-leader takes over as leader. If there's no co-leader, the clan is removed.
- Leaders and co-leaders may assign councilors of levels 1–3.
- Councilors of any level can increase bonuses.
- Councilors of levels 2 and 3 may set clan messages.
- Besides leaders, level-3 councilors can accept new members.
- Only leaders may boot members or reject recruits.
Kingdoms
Clan leaders or co-leaders can claim a kingdom for their clan. Kingdoms cover 9 land units, which can be used to build various structures.
Claiming a Kingdom
You can claim one uninhabited kingdom for your clan if you're the leader or co-leader. The cost depends on how many members your clan has and is deducted from the clan bank. You also need a clan power of 2,000 or greater to claim one.
Structures
Kingdom structures give the clan a variety of bonuses — combat ability, item strength, stats, drops, and more. You can view details for each structure at the kingdom. Structure prices are paid from the clan bank.
Demolishing Structures
You get 10% of the structure's price back into the clan bank. The Demolish button requires a double click.
Teleport buttons in the kingdom and Clan Center
Once your clan has claimed a kingdom, use the Teleport button at any Clan Center to travel to your clan's kingdom. The kingdom's Teleport button takes you back to the Clan Center you came from — or to the one in Safe Haven, if you've never teleported to your kingdom before.
List of all kingdom buildings ↗VII. More about Items
Every item has an item type. Normal items are equippable in one of the ten Inventory slots; special items are not equippable, and are either quest items or special drops. Quest items are acquired from NPCs, quest monsters, beasts, or found on the ground — most aren't tradable, and are never shrineable or sellable to shops. Equippable items take up one inventory slot when not equipped. Quest items take a slot when not held (only 5 held ones don't occupy a slot). Other item types have their own properties.
Item Trades
Every larger town and castle has a Trade Center, used to offer regular (non-quest) items to other players. You need a trade licence to take part. There are ten licence levels, increasing in price and profitability — level 1 nets 10% of the buyer's payment (the item's value), level 2 nets 20%, and so on up to level 10 at 100%. Levels 6–10 also charge a markup on top of value: level 6 charges 1.1×, level 7 charges 1.2×, level 8 charges 1.3×, level 9 charges 1.4×, and level 10 charges 1.5×. One exception: trading with a fellow clan member always uses 1× value.
You can only sell to another player if your licence level isn't more than two levels below the buyer's (so low-licence characters can't sell to high ones) — players with higher licences can sell to anyone.
Several item types can only be traded 1-for-1: Building Materials (needs TL4), Relics (needs TL6), and Documents (e.g. maps, recipes; needs TL8). These trades work a bit differently: one player offers an item at the Trade Center (optionally naming a specific player to offer it to exclusively). The second player then offers one item of the same type (ideally to the first player only). After that, either player can select the item they want from the list — this relies on trusting whoever you're trading with. You can also list something you don't need (say, a Lumber) and wait for someone to trade another material for it.
Documents (map pieces) acquired from drops or beasts are all tradable, including Map 10 from beasts. Building materials and Relics are always tradable.
| Licence | Min. Level | Ore |
|---|---|---|
| 10 | 25,000 | 100,000 |
| 9 | 15,000 | 50,000 |
| 8 | 10,000 | 50,000 |
| 7 | 10,000 | 20,000 |
| 6 | 6,000 | 20,000 |
| 5 | 6,000 | 10,000 |
| 4 | 1,000 | 3,000 |
| 3 | 1,000 | 200 |
| 2 | 10 | 0 |
| 1 | 10 | 0 |
Item Storage
At any Local Storage location, you can store excess items — everyone gets 5 spaces free of charge. For more, click "Storage Options" to see the available packages. Once you set up a Camp, you get access to the local storage there too. Upgrading local storage the first time requires a house of size two; further upgrades require house sizes of four, six, eight, and ten.
Once your clan has a fort, that location also offers storage — not shared with local storage, so upgrades are tracked separately. These depend on the fort's size, similarly to how local storage depends on house size.
Item Shrines
There are two kinds of item shrines in The LostHope. One is much like the old Item God shrine from Stratholm. There's also a stats shrine, said to be quite expensive with relatively low gains.
Item Containers
All items in a container share a single inventory slot — the individual items no longer show up in inventory, only the container does. Different container types have different maximum capacities, and only one container of a given type is effective at a time. Containers are purchased at potion shops. You don't put items into them manually — just click hold on the container item to use it. Once held, the number in [] shows its capacity (how many items it can hold, reducing slots used), and the number in () shows the total count of that item type in inventory (all items of that type are hidden, even those exceeding the container's capacity).
Item Effectiveness
Take a look at an item from inventory as an example: each stat has a regular number and a green one in brackets. As a character grows in level, they become more proficient using items, and this proficiency affects their bonuses. A green number higher than the regular stat means the character has fully mastered the item (and might want to look for something with higher stats soon).
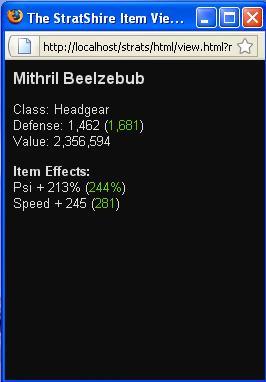
There are limits: the lower bound of the green number starts at 5% of the regular stat, and the maximum is 115%. These limits, and the IE bonus itself, can be actively improved.
Look at the IE Bonus, IE Min, and IE Max in the Other tab of Inventory to check your stats. As an example: raising IE Bonus to 100% lets a level-60,000 character use items as if they were level 120,000. Working IE Max up to 125% (from a starting 115%) lets you get up to 125% effectiveness from an item.
To improve these stats, take part in Mobopoly and hope for luck, or bring items to the NPC called the Item Recycler. They accept three item types — armor, jewelry, and weapons — giving an IE-min boost, an IE-max increase, and an IE-bonus increase respectively, each by 0.01% per item offered.
VIII. New Features
a. Touch of the Hope
Equipping several items that harmonize well in quality can earn a bonus, which increases with the number of similar items (4–5 / 6–8 / 9–10). All figures below are percentages:
- Titanium — 10/25/50 Strength, Psi
- Steel — 10/20/30 Defense
- Ancient — 10/15/20 Experience Bonus
- Godly — 20/40/60 Health
- Diamond — 25/50/100 Money Bonus
- Mithril — 5/20/40 Speed
- Adamantum — 10/25/50 Agility/Vitality
- Silver — 25/50/150 Mana
- Superior — +5/15/25 all 5 stats, plus +10% Money (4–6) / Health (7–8) / Exp (9–10)
b. Camps and Forts
As you travel farther across the map, you'll want a quicker way to cover long distances. One option is to give up and commit suicide on a monster, sending you to your last attune spot. The more elegant option is building a camp somewhere you visit often — transportation fees drop as the camp develops further.
Generally: the more dangerous the place, the higher the cost to set up a camp there. It's never possible to teleport to your camp from a different world (map). Forts are camps belonging to a whole clan and also offer basic banking.
Besides money, you need construction materials — Lumber, Brick, Roof Tile, Roof Batten, and Window are special drops (found in the same areas as stardust). To start your first camp, you need one of each material type in inventory or storage. A camp starts at size 1; you can then stock further materials, but don't let the stock exceed what's needed for the next upgrade by too much. Once there are two of each material in the stock, it can be upgraded (needing one more Lumber in inventory or storage). Camps can be upgraded up to size 10.
| Size | 1 | 2 | 3 | 4 | 5 | 6 | 7 | 8 | 9 | 10 |
|---|---|---|---|---|---|---|---|---|---|---|
| Cost | 90% | 45% | 25% | 20% | 15% | 12% | 10% | 8% | 6% | 5% |
Camps can be moved to a different place at any time; cost again depends on terrain. Any stock materials exceeding the camp's size are lost in the move, so plan ahead.
A size-10 camp can be transformed into a Fort by a leader or co-leader, who needs 4 of each building material in inventory, and the clan needs sufficient bank funds. Forts can't move, but offer better infrastructure, so transportation there is free. Each clan can have only one Fort, shared by all members. A settled clan can collect taxes from the area's inhabitants once every 6 hours — higher for tougher areas and bigger forts.
Forts upgrade similarly to camps, but need twice as much of each material in the fort's stock. Only leaders and co-leaders can trigger upgrades, though any member may contribute goods and share in the taxes. A size-10 fort grants the clan 1 additional free kingdom land, another at size 50, and another at size 120.
c. Strange Bio-void Machine
Usable only with access to the eastern lands, where you'll find the manipulator cards it needs, plus a cost of twice the item's value in cash. Success always depends on the card's probability stat. The machine works on all equippable items and has five modes:
| Append | Adds a random bonus if the item already has 1–5. The amount depends on the card, and effectiveness may reach up to 10.5% of the current highest bonus amount. Maximum bonuses per item: 6. |
|---|---|
| Switch | Changes the item's second bonus to a different type, with up to 10% loss (if effectiveness is below 100%) or up to 5% gain (above 100%). Possible results: Defense, Damage, Health, Strength, Agility, Psi, Vitality, Speed (or their %-variants) — never Damage on armor or Defense on weapons/staffs. |
| Extinguish | Removes the item's last bonus. |
| Merge | Takes 50% of the last bonus away and adds 90–105% of that amount to the preceding bonus. |
| Equalize | Reduces the highest bonus by 10% and adds 90–105% of the result to another bonus. |
| Rotate | Moves the first bonus to the second position, the second to the third, and the last back to first — amounts stay in their positions. |
d. Letter-man
This NPC helps increase your natural stats — you use letters to spell out the name of a stat.
e. Tournaments
Tournaments can appear in various forms at any time — here are details on the Arena Tournament. Anyone can take part, and there are three winners. Players are grouped into four brackets: below level 100, below level 1,000, below level 10,000, and everyone above level 10,000. Each bracket has different rewards and a different quest path/difficulty; the first winner usually gets a unique item.
When a tournament is announced, walk around the castle or nearby and look for an Arena Ticket. This lets you pass the barrier to the castle's portal — but show your ticket to the flower girl (also in the castle) first, and she'll give you a rose of a particular color. The portal leads to the inner arena; step through the Flames and find the NPC matching your rose's color, who guides you through the tournament.
The final task is always to defeat a gladiator somewhere on the map. Give their helm to the knave for a Flag of your color. In the center area, the judge takes your flag and gives you a medal — hand that to the flower girl outside to see your reward. You may leave the arena at any time via the central portal.
Once all three winners have their prizes, everyone is moved out of the arena, the portal vanishes, and all quest items disappear from inventories.
f. New Spells
1. Illusion spells (I–IV), which change the type of special mobs, can be found from twisters: Disbelieve Illusion, Summon Illusion, Confusion, and Revelation.
2. Stat-boost spells can drop from any caster and have power levels 1–11:
- Ogre Strength (Fighters: damage)
- High Precision (Sharpies: damage and agility)
- Mind Power (Casters: psi)
- Ninja (Fighters: agility)
- Stamina (Casters: vitality)
- Dervish (Sharpies, Dark Mages: fewer monster turns / more player turns)
- Shield of Protection (Fighters, Warlocks: defense)
Levelling these new spells works the same as with Heal spells, and mana usage depends on the player's race. Have fun hunting!
g. Pickpocket
Stealing money from other players is experimental and might be disabled or restricted to special zones (DL). Steal and arrest actions are performed from the Other Players menu on the Land view. Success chance is mostly driven by the Pickpocket and Sheriff skills. There are four outcomes when stealing:
- The thief gets some money, depending on the level ratio between thief and victim, and gets away unnoticed.
- The thief succeeds but is spotted — a red star appears next to their icon on the map, and other players may try to arrest them (by default for 15 minutes). During this time the thief can't use banks, item storage, camps, or forts, and gets a cooldown on further attempts (default 40 minutes, halved with the Pickpocket skill).
- The thief is caught in the act and sent to jail for a while (default 15 minutes).
- The thief fails and is sent back to their attune spot.
Other players can try to arrest a thief showing a red star. Success sends the thief to jail and rewards the arresting player based on the level ratio; failure sends that player back to their attune spot.
h. Smithy
The smithies (one in the west, one in the east) can change the quality name of your items. The effect is very random — items can become Superior, or, in the worst case, just Fluffy. Each use takes seven building materials from inventory or storage.
i. Monopoly Contest (Mobopoly)
NPC: Banker @ 15,15 — Kobold Village. Visit the NPC to activate the competition; it tells you which mob to fight first. As you kill each intended mob, the game announces it and the fight window shows the next target (except for Illu — visit the NPC again for that one). Usually 3 special mobs are required to complete the competition. It runs 2–3 times daily at varying times, with 5–10 minutes' notice. There are rewards for each part completed (stats), plus a jackpot that builds during the event (everyone earns only half money while it's active). The jackpot goes only to whoever kills all the monsters, after which the event ends.
j. Temple of Enchantments
Found in several worlds; its priests are said to be very friendly (but gold-hungry, as always). This is the only place to directly add another bonus to an equipment item. It requires Star Gems and Stardust. You need to sacrifice gold worth at least 5 times the sum of item value and gem value for a minimum chance of success — 10, 15, 20×, etc. if the item already has bonuses. The maximum number of bonuses per item is 6, and it takes 10, 20, 30… Stardust depending on how many bonuses are already there.
k. Living Skills
These skills are useful for producing and improving items rather than for combat — e.g. crafting camp materials is much faster than waiting for them to drop from battles. The more you practice, the better the results, because they actually level up.
They work a bit differently: each has a base value (you spend experience points into it) and a bonus value that rises with practice, so these skills should never be dropped. In fact, they don't use any of your 6–8 skill slots.
There are three Collecting skills: Mining, Lumbering, and Gathering. To get one, buy the matching tool at the weapon shop and find the NPC near the castle.
You'll find plenty of resource locations around the land: Ore Mine (Mining), Wood Pile (Lumbering), Herb Field, and Other Resource (Gathering). Interacting shows basic info, an action button, and a progress area. As your skill bonus grows, you can perform the action more than once per click, and special things — good and bad — can happen occasionally.
Six new buildings put resources to use: Camp Workshop (camp materials, requires Crafting), Alchemist Laboratory (potions, requires Alchemy), Powder Workshop (requires Alchemy), Armorer (raises the base value of equipment, requires Armorer skill), and Ship Workshop (requires Craftsman). Each location lists what can be built or improved there and the resources needed — and like the Collecting skills, each has a trainable bonus.
l. Reincarnation
Once there's nowhere further to progress, reincarnation gives a high-level character another evolution to pursue. Visit the Sacred Temple and speak to the priests there to do it.
Requirements
The priests also mention a number of foes to defeat, but that part isn't actually checked. Level, gold, and ore all are:
- At least level 5,000, plus 10,000 more for every reincarnation you've already completed — so 15,000 for your 2nd, 25,000 for your 3rd, and so on
- At least 10,000,000,000 gold
- At least 5,000 ore
What happens
- Your level, experience, gold, and ore are all reset to 0 — this includes your bank balance, not just what you're carrying.
- Your Health, Mana, Strength, Agility, Vitality, Psi, and Speed are all reset back to what they were the moment you created your character.
- On top of that reset, your Strength, Agility, Vitality, Psi, and Speed each get a flat bonus added back, so you're not left at your literal starting-character numbers. This bonus grows with each reincarnation you've done — see the table below.
- Your race is bumped up a tier, which improves your per-level stat growth and your odds on Collecting/crafting skills. This caps out after your second reincarnation (the highest race tier) — a 3rd, 4th, etc. reincarnation still resets everything above and still counts, it just doesn't raise your race any further.
- Your IE Min — the floor on how much of an item's stated bonus actually applies to you, shown on your Character screen — permanently increases by 10 percentage points, every time you reincarnate.
- Your inventory is wiped. Skills, spells, your house, any objects you've built, and quest progress are all lost, along with every item you're carrying or wearing — except items bought or awarded as Platinum, which survive. You're issued a fresh set of starting gear for your class afterward, same as a brand-new character.
- Pets are lost along with everything else, even a Platinum-flagged one — they never survive a reincarnation.
- If your Platinum balance is at 0 when you reincarnate, you're given 1 back as a small cushion; if you already have Platinum banked, reincarnating doesn't add more.
There's no limit on how many times you can reincarnate, as long as you can afford the gold/ore cost each time.
| Reincarnation # | Bonus is worth |
|---|---|
| 1st | 50 levels' worth of growth |
| 2nd | 300 levels' worth of growth |
| 3rd | 750 levels' worth of growth |
| 4th | 1,400 levels' worth of growth |
| 5th or later | 2,250 levels' worth of growth (caps here) |
"Levels' worth of growth" means the bonus is calculated as though your character had gained that many normal levels at your post-reincarnation class and race — not a fixed number of stat points, since every class and race gains stats at a different rate per level. It's meant to smooth out the early game right after a reset; against the stat totals a high-level veteran reaches, it becomes a rounding error.
Ongoing per-level stat growth
Separately from the one-time bonus above, reincarnating also permanently improves every future level-up: your class and race's Strength, Agility, Vitality, Psi, and Speed growth per level is boosted 25% per reincarnation, compounding — so the benefit keeps paying off for as long as you keep playing that character, not just right after the reset. (Health and Mana growth per level get their own smaller flat bonus instead, not this multiplier.)
| Reincarnation # | Per-level growth is |
|---|---|
| 1st | 125% of normal (+25%) |
| 2nd | 156.25% of normal (+56.25%) |
| 3rd | 195.31% of normal (+95.31%) |
| 4th | 244.14% of normal (+144.14%) |
| 5th or later | 305.18% of normal (+205.18%, caps here) |
Temple of the Gods (currently inactive)
A second NPC, the Temple of the Gods, still describes a further "second reincarnation" — requiring a Legendary Elemental or Ether Hide on top of its own level, ore, gold, and kill requirements. This isn't currently active; using it has no effect either way. The race-tier progression above already covers what this used to provide, so there's no reason to go looking for it for now.
IX. Pets
A pet is a player's best friend — or at least it always tries to entertain them. Raising one takes a while, but high-level pets contribute real value: stats, skills, and sometimes their own items. There's a good variety of pets, each with its own benefits, and each with one or two terrain types it's weak against.
A player may own several pets at once (they count as inventory items) but can only have one equipped at a time. If it's still an egg, equipping it starts hatching; otherwise it mounts the pet. View your equipped pet under the Pet tab, which updates after a few moments. A pet egg can't be unequipped until hatching finishes. Pets can't be dropped from inventory — they have to go to the zoo to be gotten rid of.
a. Pet Eggs / Hatching
Every new character gets a free pet egg to start with. It begins at 1 stamina, 0 experience, 0 level. Stamina rises automatically while the egg is equipped — the goal is to reach 1,000 stamina, at which point you can press a button to hatch it into a level-1 child pet. It already has some stats, which count toward your character's stats (after item calculations) as long as the pet has stamina. Each pet has one or two terrains it's less effective in.
b. Child Pets / Feeding
After hatching, you may name your pet (also possible any time its stamina is 66). For child pets, stamina always decreases, so feed it when stamina gets low to top it back up. Reaching zero isn't a disaster — the pet simply stops contributing its bonuses until fed again.
Keep feeding until the remaining-feeds counter hits zero, at which point the pet levels up if it has the required experience (100%+); its stats rise, and it sometimes gains a new stat or basic skill randomly. Feeding uses Powder, gained by decomposing quality armor at the Talking Rock — you'll start with Fluffy items for this. Each feeding needs 10 Powder. At levels 17, 18, and 19 you'll need Superior Powder instead, made by combining other powders.
c. Adult Pets / Levelling
Finishing the last feeding at level 19 turns the pet into a level-20 Adult. Adult pets have a chance to gain a second (major) skill and two accessory slots.
d. Pet Stats, Skills, and Accessories
Your pet improves with each level: besides Health and Mana bonuses, it contributes a stat typical to its type, and develops a 4th stat at higher levels. From level 10 to 20, you can train your pet each time its remaining-feeds count hits 2 (train right after feeding).
| Pet | HP | MP | 3rd Stat | 4th Stat | 1st Skill | 2nd Skill | 1st Terrain | 2nd Terrain |
|---|---|---|---|---|---|---|---|---|
| Kodophant | 8% | 2% | Defense% | Vitality | Toughness | Master Defense | Marshes | Swamp |
| Hawkpard | 3% | 6% | Damage% | Speed | Nimbleness | Master Melee | Dreamland | Dreamland II |
| Unicorn | 6% | 9% | Magic Damage | Psi | Magic Resistance | Master Magic | Darkness | — |
| Pegasus | 5% | 5% | Agility | Speed | Bartering | Master Keenness | Cave | Deep Cave |
| Coredragon | 9% | 3% | Strength | Damage% | Fire Mastery | Science | Hills | Nomad's Haven |
| Phoenix | 7% | 6% | Vitality | Magic Damage | Wind Walk | Clear Vision | Deep Forest | Dark Woods |
| Psi Tiger | 4% | 4% | Psi | Speed | Thievery | Master Unarmed | Deep Ocean | Rough Seas |
| Mambowoki | 6% | 5% | Speed | Agility | Swift Stab | Master Ranged | Desert | Burning Sands |
| Cute Fishie | 9% | 1% | Health | Strength | Water Mastery | Water Walk | Cliffs | Frozen Peaks |
A pet can have two skills, predefined by pet type and strengthened as it grows — unlike players, pets can't swap skills. If a pet's skill conflicts with a player skill, the higher one applies. Train an adult pet's skills after each feeding if you have the resources.
Pet accessories can be added once a high-level pet unlocks a slot for one. The pet tab's selection box lets you choose an ordinary necklace from inventory — it leaves your inventory permanently and stays on the pet, acting like an extra item slot for your character while mounted.
Only adult pets actively join battle. The chance depends on pet level; the strength depends on pet stamina:
- Kodophant
- "trample" — up to 10% damage to enemy
- Hawkpard
- "protect_attack" — protection against physical attacks
- Unicorn
- "health" — heals health
- Pegasus
- "protect_cast" — protection against magic
- Coredragon
- "mdrop" — up to +25% drop quality at full stamina, down to −25% at zero
- Phoenix
- "mana" — heals mana
- Psi Tiger
- "cast" — a 4th magic attack
- Mambowoki
- "attack" — an additional physical attack
- Cute Fishie
- "specs_trample" — up to 50% damage to enemy (specs)
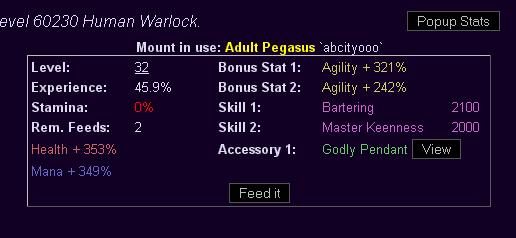
More options for pets are available at the Stables, found near towns.
e. Choosing Your Pet's First Skill (new)
Each pet type used to be locked into one fixed 1st Skill (the "1st Skill" column in the table above). You can now pick which of three related skills your pet learns instead, right from the mount screen — if you never make a choice, your pet keeps the same default it always had, so nothing changes unless you opt in.
| Pet | Default | Alternate | Alternate |
|---|---|---|---|
| Kodophant | Toughness | Magic Resistance | Swift Stab |
| Hawkpard | Nimbleness | Swift Stab | Toughness |
| Unicorn | Magic Resistance | Wind Walk | Fire Mastery |
| Pegasus | Bartering | Wind Walk | Water Mastery |
| Coredragon | Fire Mastery | Thievery | Toughness |
| Phoenix | Wind Walk | Fire Mastery | Magic Resistance |
| Psi Tiger | Thievery | Swift Stab | Magic Resistance |
| Mambowoki | Swift Stab | Nimbleness | Thievery |
| Cute Fishie | Water Mastery | Toughness | Bartering |
f. Pet for Sale
You can buy pet eggs cheaply at the Misc shop. Neither pet eggs nor pets can be sold to shops. Pets at level 10 or higher can be traded at the Trade Center — only TL1 is needed. This can be handy, since some pets pair better with certain character classes than others.
X. Etc
Contact Information
Bug Reporting
There's a forum thread for reporting bugs — just make sure it hasn't already been reported.
Contact
If you need to reach an admin, either PM them in-game or email them (contact form on the login page).